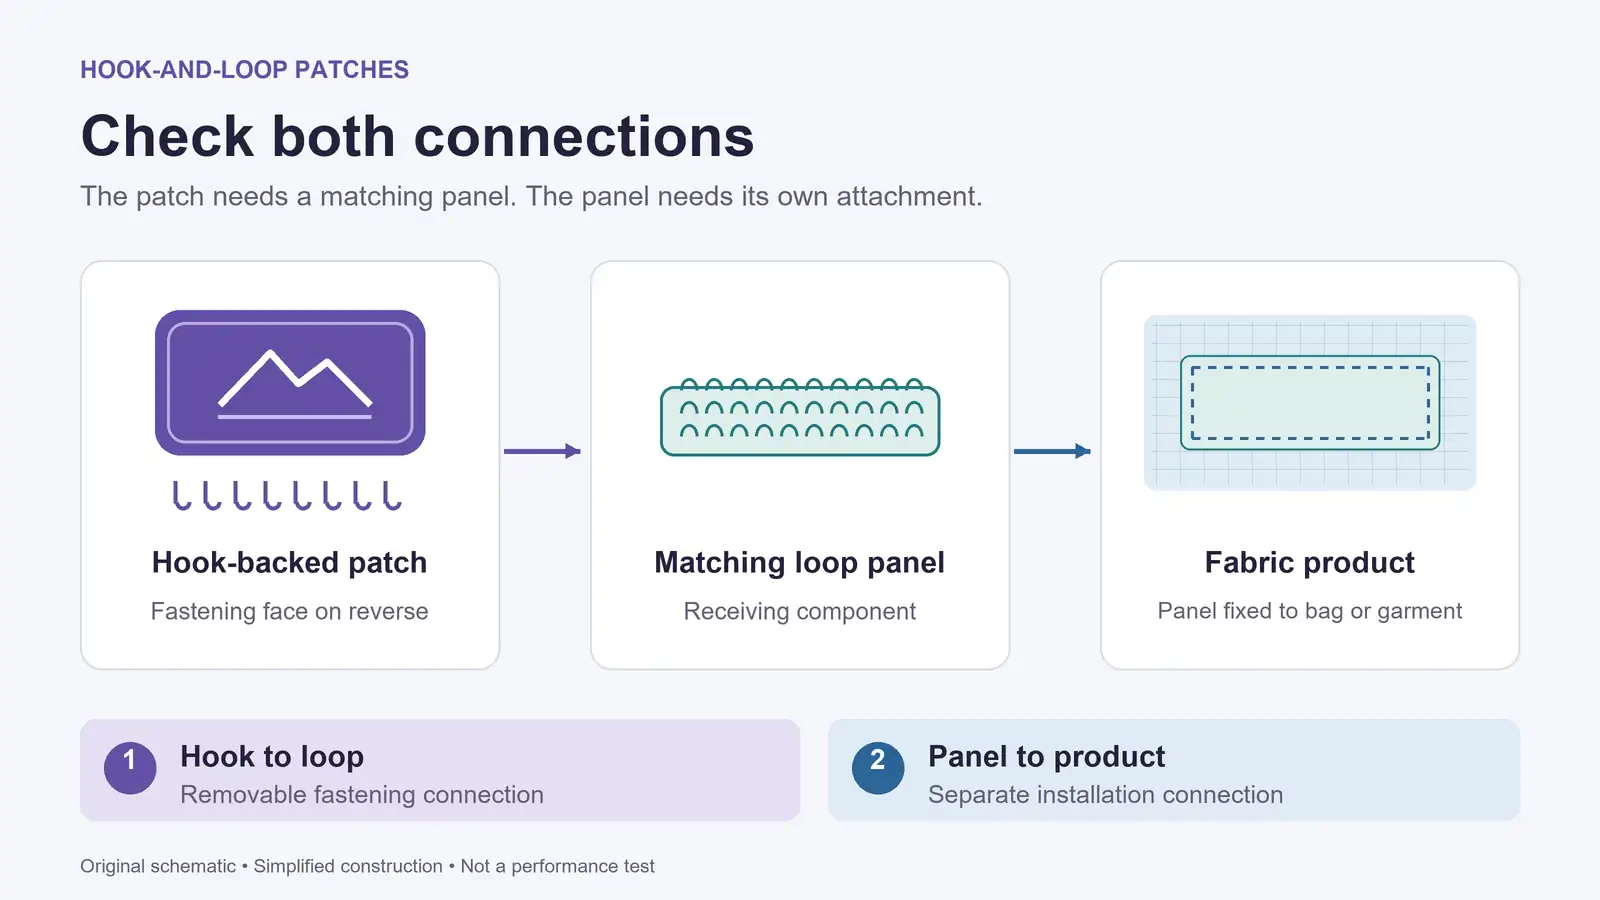
A hook-backed patch needs a compatible loop receiving panel. The hook surface on the back of the patch does not act as glue, so pressing it against an ordinary backpack or jacket will usually not secure it. Check both surfaces before replacing the patch: does the product have a loop panel, and is that panel firmly attached to the product?
There are two connections to check: patch to receiving panel, and receiving panel to garment or bag. A failure at either connection can look like a patch that will not stay on.
Check what is actually on each side
Turn the patch over. A conventional hook backing has small hooks that engage a compatible loop surface. A loop panel has the receiving fibers. Neither surface should be confused with the material or adhesive used to fix that component to something else.
If you are identifying the backing for the first time, our guide to hook-and-loop embroidered patches explains the basic construction. For a patch that will not attach, start with these three checks:
- Patch back: is it hook, loop, a covered fastening surface, or a different backing altogether? Read the supplied specification instead of identifying it only by color.
- Receiving surface: is there a purpose-made, compatible panel where you want to place the patch? Ordinary woven fabric is not a loop panel. A fuzzy lining or fleece surface is not automatically a suitable substitute either.
- Panel installation: is the loop component already fixed to the product, or is it a loose piece supplied with the patch?
A loose matching loop piece can arrive pressed against the hook backing. It may look like one thick backing until the two fastening faces are separated. If that is the supplied construction, the loose loop piece still needs its own suitable attachment to the backpack or jacket. Do not cut or peel apart an unidentified bonded layer to find out what it is; ask the supplier for a labeled back view.
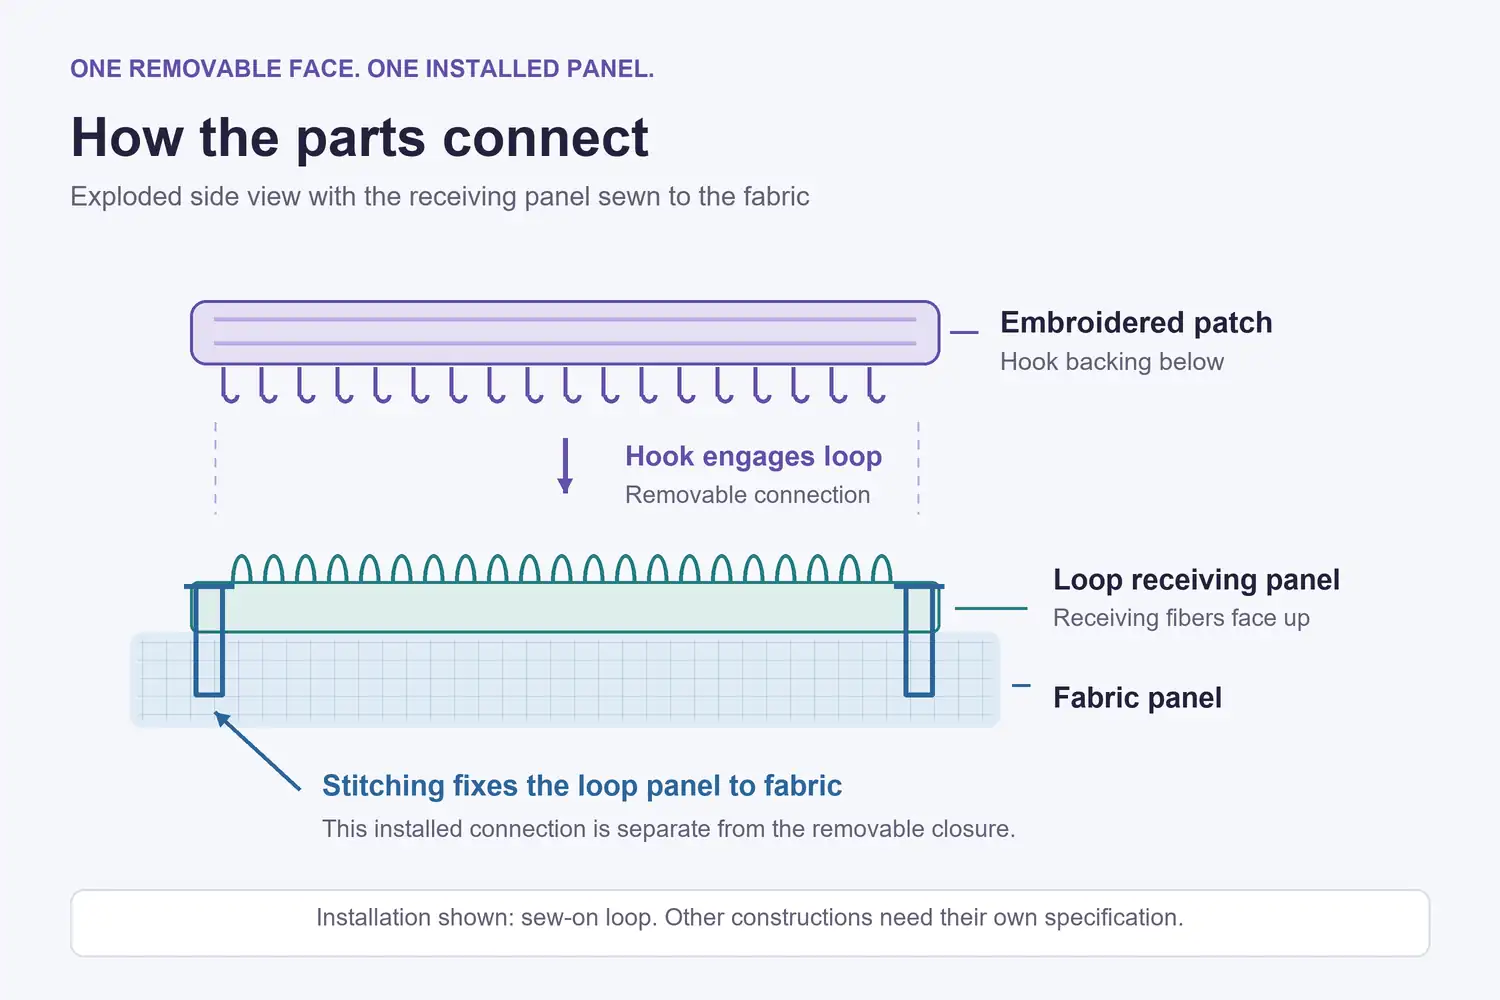
Find the connection that is failing
Hold the receiving panel in place and gently separate the patch at an edge. Observe which parts move. This simple check distinguishes a fastening problem from a panel-installation problem; it does not measure holding strength.
| What you observe | What to check first | Useful next step |
|---|---|---|
| The hook back does not grip the bag or jacket at all | No compatible receiving panel at the intended position | Identify the product surface and specify a matching loop panel plus its installation method. |
| Both contact surfaces appear to be the same type | Hook facing hook, or loop facing loop, in a conventional two-part system | Confirm the component names and obtain the intended mating component. |
| The patch grips only at a few points or lifts at an edge | Partial overlap, a panel that is too small, curvature, contamination, or a mismatched pair | Check full contact and alignment; compare the exact pair on the actual product. |
| The patch and loop piece come away together | The panel-to-product connection has failed or was never installed | Inspect the panel's stitching or adhesive attachment. Stronger hooks will not repair that connection. |
| The fastening backing separates from the embroidered patch | The backing-to-patch construction itself | Stop using that assembly and send the supplier photographs of the separated layers for review. |
| The same installed pair used to work but now releases easily | Debris in the hooks, damaged fastening faces, wear, or a loose panel | Inspect and clean according to the component maker's guidance; replace damaged parts when needed. |
Conventional hook-and-loop components have complementary faces. Some other reclosable systems use a different construction, so identify the supplied system before applying this table to it.
Does your backpack or jacket have a receiving panel?
An ordinary backpack needs an attachment plan
Look for a dedicated patch panel, not just rows of webbing. MOLLE-style webbing alone is not a loop receiving surface. A bag may have webbing, a loop-faced panel, or both; check the actual face where the patch will sit. Hook material can snag incidental fibers without creating the intended fastening connection.
If there is no suitable panel, decide how a separate loop piece will be attached. Sewing a sew-on loop component to a suitable fabric panel is one route. Check access to the reverse side before sewing: a finished bag can have pockets, foam, lining, or compartments behind the chosen position. Attaching the patch must not unintentionally sew a pocket shut.
For a new bag design, the factory can assess installation while the component is still accessible. For an existing bag, show a repair or sewing professional both sides of the intended area before choosing the construction.
A jacket needs the same two connections
A hook-backed patch is not automatically an iron-on patch. Heat does not turn the hook face into glue. If a separate loop component has an adhesive backing, identify whether it is a pressure-sensitive product, a heat-activated product, or another specified system. A peel-off liner alone does not establish that it is suitable for your jacket or for laundering.
Adhesive selection depends on the exact component and receiving material. VELCRO Brand's adhesive and lamination guidance describes different systems and calls for testing the adhesive for its intended use. Use the instructions for the actual product supplied; do not borrow a temperature, pressure, dwell time, or waiting period from an unrelated tape.
For a coated or waterproof jacket, check the garment maker's repair guidance before applying heat, adhesive, or new stitching. Sewing through the shell can create needle holes, and a receiving panel by itself does not establish waterproofness. For broader heat-application questions, see our iron-on backing guide.
If a previously working patch has stopped holding
Remove loose lint and debris from the hook surface carefully, using the fastening maker's recommended cleaning method. Inspect the loops and the panel's attachment at the same time. A dirty hook face and lifting panel edges can occur together.
Then press the intended pair together across the available contact area and check it on the actual product. A flat bench check can miss a curved bag surface, a folded jacket panel, or an exposed edge that catches during use. If cleaning and alignment do not restore satisfactory engagement, ask for a compatible replacement pair rather than repeatedly forcing worn or damaged components together.
Do not treat a successful hand check as a wash-life or durability guarantee. The closure, the panel attachment, and the garment or bag must be assessed together for the intended handling and care routine.
Specify the complete set before ordering
The phrase “hook-and-loop backing” can leave the supply scope unclear. A useful order description names the patch backing, the receiving component, and who installs it. Confirm each item separately:
- Patch: finished dimensions, shape, artwork, hook or loop on the reverse, and the approved fastening component.
- Receiving panel: whether it is included, its mating component, dimensions, shape, color, and the intended overlap with the patch.
- Panel attachment: sew-on, a specified adhesive construction, or another agreed method; supplied loose or installed on the product.
- Receiving product: fabric or surface specification, coating or finish, position, curvature, lining, and access for installation.
- Sample and care checks: the actual patch-and-panel pair on the intended product, expected removal and refitting, edge lifting, the panel attachment, and the required care routine.
For example, “hook-backed patches with matching loop pieces supplied loose” is a different deliverable from “hook-backed patches for an existing approved loop panel.” Neither description means that a receiving panel has already been installed on a jacket. If the garment or bag factory will perform that work, include the loop component and installation details in its specification as well.
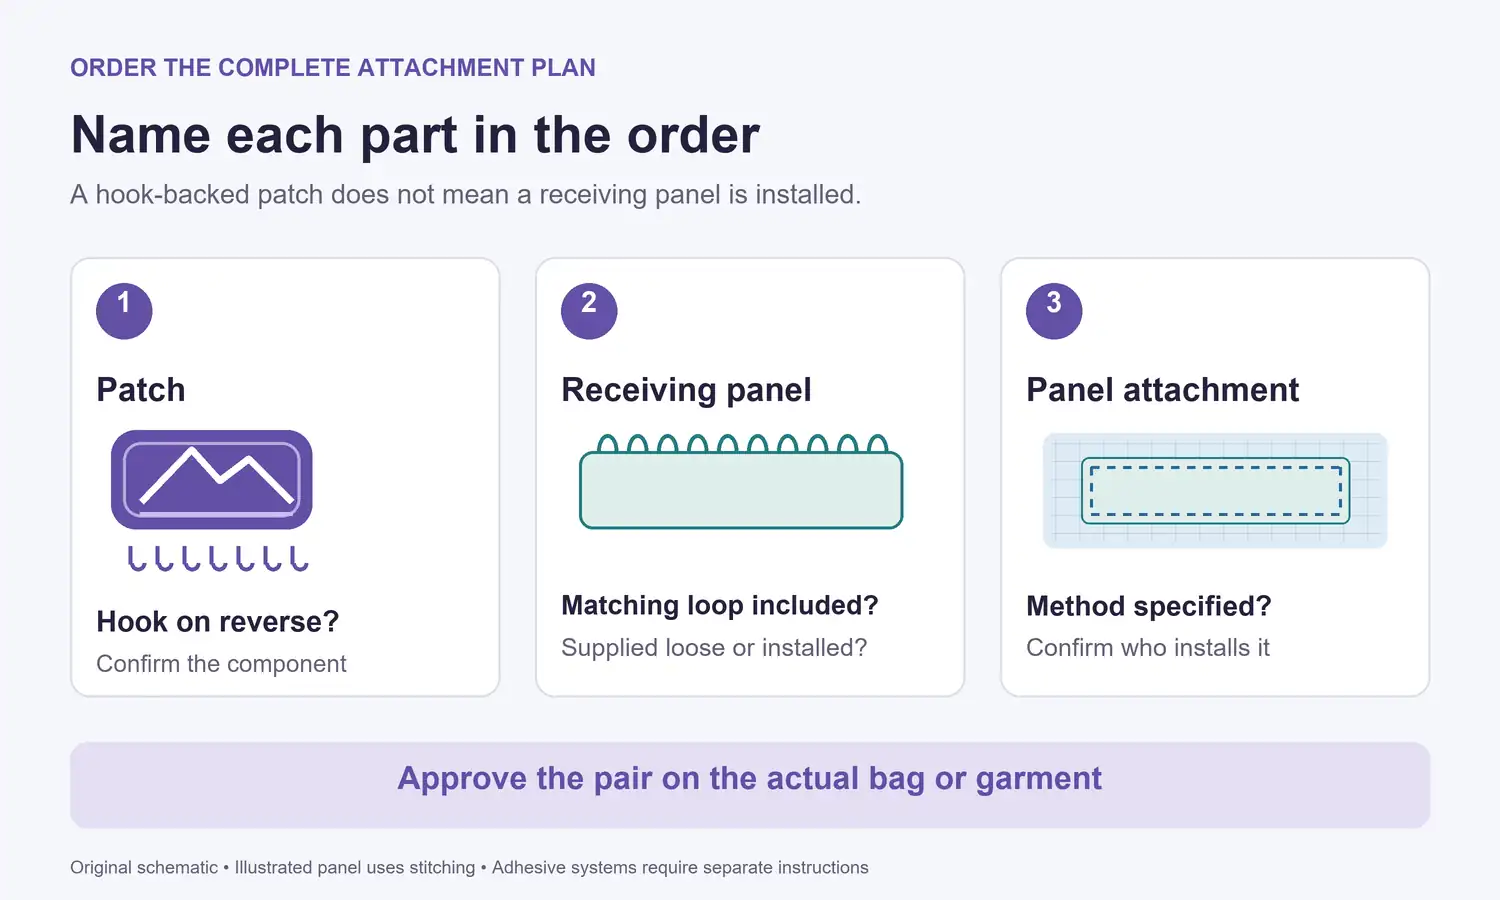
Keep an identified approved pair when planning repeat orders. A similar-looking replacement component should be checked with the retained mating piece, particularly if the patch will be used on products that already have receiving panels. Record the intended use and agreed checks instead of assuming all hook and loop combinations perform identically.
Send the supplier both sides of the problem
For an attachment problem, send a clear photograph of the patch back, the intended receiving area, and any loose component supplied with it. Explain whether it never attached, releases at the hook-to-loop connection, or comes away with the receiving panel. Include the product material and any available care or component specification.
For a new custom order, contact YQX Patches with your artwork, finished dimensions, quantity, product photos, and the required receiving-panel supply scope. Ask for the proposed components and sample checks to be stated in the quote. That gives the patch supplier and the garment or bag maker the same attachment plan before production begins.
Featured illustration: Original schematic of a hook-backed patch, a separate loop receiving panel, and the fabric carrying that panel. It illustrates two connections and does not represent a tested product.